|
|
|||||
|
|
|||||
|
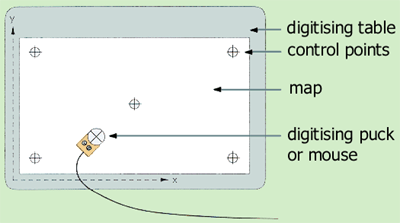
introduction Digitising is the transformation of information from analog format, such as a paper map, to digital format, so that it can be stored and displayed with a computer . Digitising can be manual, semi-automated (automatically recorded while manually following a line), or fully automated (line following). Manual digitising involves an operator using a digitising table (or tablet) (known as heads-down digitising), or with the operator using a computer screen (heads-up digitising). The digitising table has a fine grid of wires embedded in it that acts as a Cartesian coordinate system. The coordinate may be in plane or geographic coordinates. The procedure involves tracing map features in the form of points, lines or polygons with a mouse (puck) which relays the coordinate of each sample point to be stored in the computer (see Figure 1). The tablet and puck acting together with the computer can locate the puck s position relative to reference information provided by the operator.
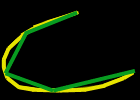
There are two modes of digitising: point-mode and stream-mode (see Figures 2 and 3). The resolution of coordinate data is dependent on mode of digitizing. In point-mode the digitizing operator specifically selects and encodes those points deemed "critical" to represent the geomorphology of the line or significant coordinate pairs. This requires some knowledge about the line representation that will be needed. In stream-mode the digitizing device automatically selects points on a distance or time parameter, which generates sometimes an unnecessary high density of coordinate pairs.
On-screen digitising is an interactive process in which a map is created using previously digitised of scanned information. This method of geocoding is commonly called "heads-up" digitising because the attention of the user is focused up on the screen, and not on a digitising tablet. This technique may be used to trace features from a scanned map or image to create new layers or themes. On-screen digitising may also be employed in an editing session where there is enough information on the screen to accurately add new features without a reference image or map. The process of on-screen digitising is similar to conventional digitising. Rather than using a digitiser and a cursor, the user creates the map layer up on the screen with the mouse and typically with referenced information as a background. There is always a requirement to transform coordinates from the digitiser system to the real world system (e.g. national map grid). Digitising errors will always occur (undershoots, overshoots, triangles). Editing of digitised features involves error correction, entering missing data, forming topology. There are many issues to consider
before digitising commences, including: Map registration or Georeferencing Registration of the map needs to be performed for each new digitizing session, as well as each time the map's position is changed on the digitizer (see Figure 1). This is so that the coordinates of the digitiser can be converted into geographic coordinates. The digitising program will require the map scale, and the geographic coordinates of the control points which will be used. These control points should generally be well spaced, for example near the corners of the map. Depending on the software being used a minimum of four points are required. These locations of these points then need to be digitised. Always use the same control points for each session of a particular map sheet. Some software may require the establishment of the size of the digitizing window by clicking in the lower left corner and upper left corner of the region of interest. An error limit needs to be specified. This is the maximum error that is acceptable to register your paper map. The default error limit is 0.004 inches (or its equivalent units). Once you enter a minimum of 4 pairs of map and paper control points, ArcView calculates the Root Mean Square (RMS) error and compares the value with the one you specified in the Error Limit edit box. If the calculated error is less than the specified error limit, Register button is enabled for you to register the map.
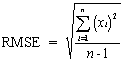
The Root Mean Square (RMS) error represents the difference between the original control points and the new control point locations calculated by the transformation process. The transformation scale indicates how much the map being digitised will be scaled to match the real-world coordinates. The RMS error is given in both page units and in map units. To maintain highly accurate geographic data, the RMS error should be kept under 0.004 inches (or its equivalent measurement in the coordinate system being used). For less accurate data, the value can be as high as 0.008 inches or its equivalent measure. The RMSE is given by:
Where: Common causes of high RMS error are - incorrectly digitised control points, careless placement of control points on the map sheet, and digitising from a wrinkled map. For more accurate results when digitising a control point, check that the crosshairs of the digitiser puck remain centered on the control point.
Another approach is to use a scanner to convert the analogue map into a computer-readable form automatically. One method of scanning is to record data in narrow strips across the data surface, resulting in a raster format. Other scanners can scan lines by following them directly. Maps are often scanned in order
to: Scanning requires that the map scanned be of high cartographic quality, with clearly defined lines, text and symbols; be clean and have lines of 0.1mm width or wider. Scanning comprises two operations: Editing of scanned data can include: pattern recognition of shapes and symbol candidates; line thinning and vectorisation; error correction; supplementing missing data, and forming topology.
|
|||||||||
| Click here to download all theory presented in this module | |||||||||
|
|
|||||||||